RSS

Sweet & Spicy Chicken with Veggies

photo 1 (14)

Sweet & Spicy Chicken with Veggies

Preheat oven *425

For the marinade:

1 cup of soy sauce

1/2 cup of brown sugar

4 tbsp. Sriracha hot chili sauce

3pds. of boneless,skinless chicken

1 head of broccoli

1/2 cup of carrots

2 medium sweet onions

3 tbsp.  of Extra Virgin Olive Oil

1 tbsp. of minced garlic

1/2 lb. of fettuccini noodles

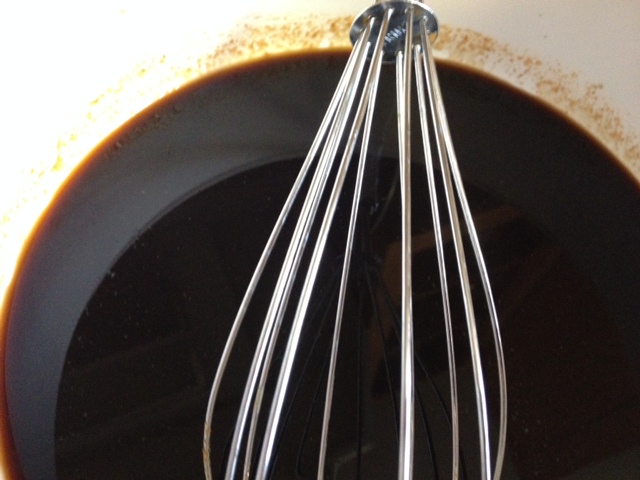
Okay first of I have to tell you about the heavenly marinade I made for my chicken.

While I was at the grocery store I spotted Sriracha Hot Chili Sauce and decided I would try creating a marinade for my chicken with it.

photo 4 (4)

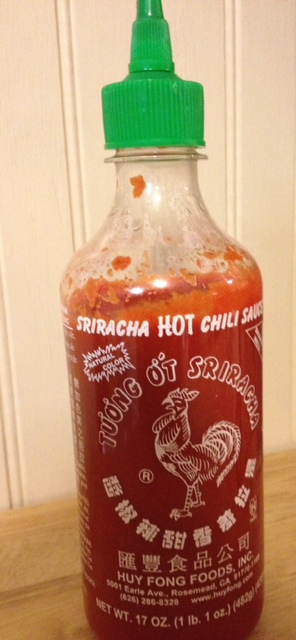
I am in love with this stuff!!! The amounts for the marinade seem like a lot but that is because I only use half as a marinade and reserve the other half to use as a sauce.

For the marinade I whisked together –

1 cup of soy sauce

1/2 cup of brown sugar

4 tbsp. of the chili sauce

photo 1 (12)

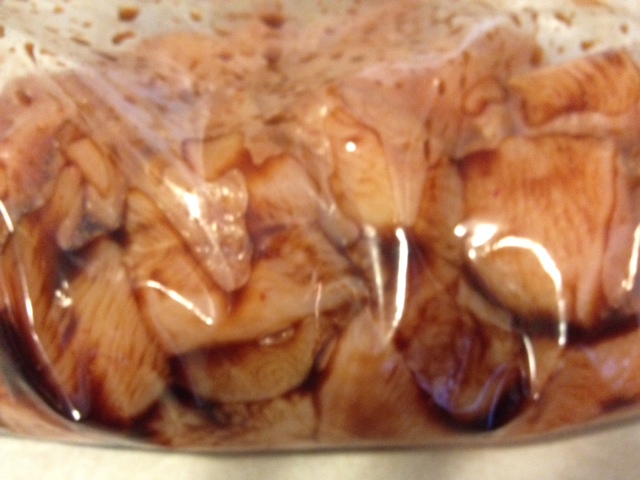
Chop up 3 lbs of skinless chicken breast into bit size pieces and place the chicken and half of the marinade into a storage bag.

Allow it to marinade about 2-3 hours (in the refrigerator) to soak into the chicken.

photo 2 (12)

Chop up –

1 head of broccoli

2 medium size sweet onions

1/2 cup of carrots ( I like to use baby carrots and slice them in half lengthwise)

Place the veggies on a baking pan ( I use foil to keep clean up easy) and drizzle with 3 tbsp.  of Extra Virgin Olive Oil (you can use more or less depending on how health conscious you are).

Then sprinkle the veggies with 1 tbsp. of minced garlic.

photo 3 (7)

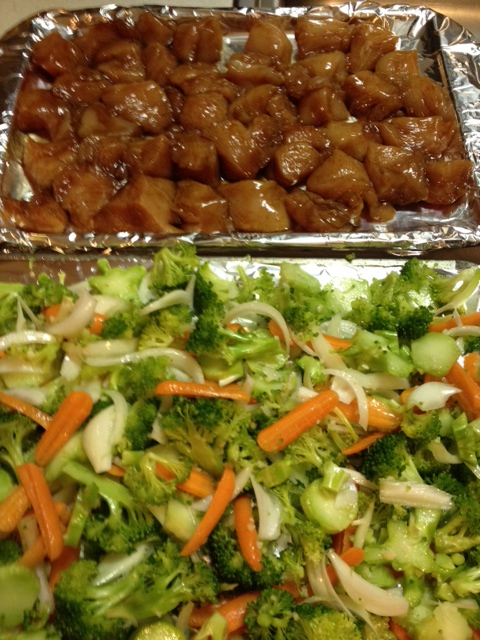
Place the chicken on another baking pan (again I cover it with foil) and place both pans in the oven at *425. The veggies took about 20 minutes but the chicken took about 30 minutes. I always check my poultry with the meat thermometer just to be safe. And also keep in mind that all ovens cook different, so adjust time according to how fast or slow your oven cooks.

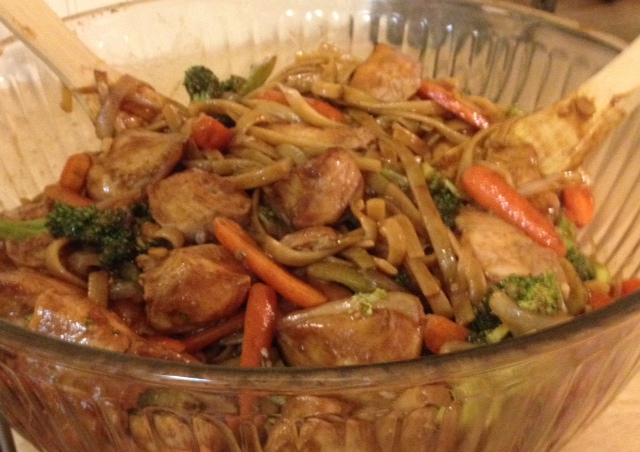
While the chicken and veggies are baking, boil  1/2 pd. of fettuccine noodles (follow directions on box.) Keep the eye hot while you drain the noodles and pour the other half of the reserved sauce into the pan (I do not use any of the marinade that has been on the raw chicken.) After the sauce heats for a minute add the noodles back in and turn off heat.

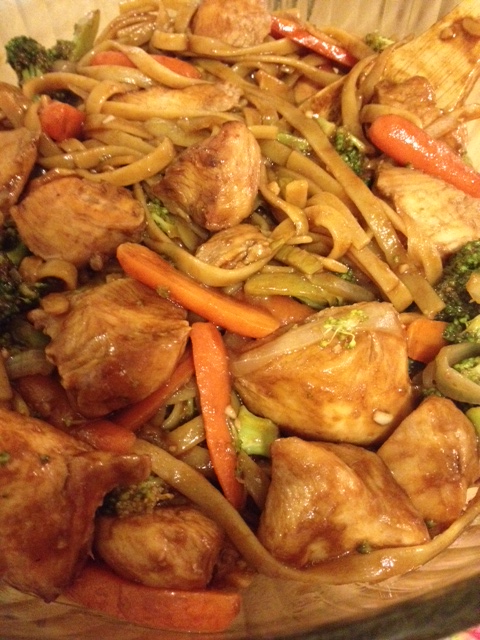
In a large mixing bowl combine veggies, chicken, and noodles. And enjoy!!

photo 5 (1)

If anyone has any recipe ideas for the sriracha chili sauce I would love to hear them!! 🙂

 
Leave a comment

Posted by on February 20, 2014 in Previous Recipes


Tags: , , , , ,

Blueberry Cheesecake Trifle

I have seen lots of recipes for trifles and always wanted to make one so I decided to give it a try. Most recipes I found said to let it sit for 4-6 hours or longer. Well… I of course had to look at that gorgeous bowl of blueberry cheesecake heaven  sitting in my fridge and after about an hour I couldn’t take it anymore, so we dug into it. I could tell immediately why you are supposed to wait. It was good but needed to be colder. So the next morning we dug into it again and the say “good things come to those who wait” is so true! It was delicious. I do wish I had some granola to top it with but it made so much I am sure I will have time to pick some up and add it to it before it is all gone…hopefully 😉 The great thing about this is it is not a really sweet dessert. It has a sweetness to it but it is not overly sweet like most desserts.

photo 2 (10)

1   baked angel food cake ( cut into bite size chunks) – this was the first Angel Food cake I had ever baked and it was the easiest cake I have ever made. I see a lot more of these cakes in my future! You can use a store-bought cake if you want to make it even easier.

photo 1 (10)

3   8 oz. packages of cream cheese (softened)

1/2 cup of vanilla yogurt

2   16 oz. container of cool whip

1   3 oz.package of cheesecake flavored pudding

2 cups of milk ( to make the cheesecake pudding with)

2   21 oz. cans of blueberry pie filling

First cut the angel food cake into bite size pieces and set it aside.

Next prepare your cheesecake flavored pudding by the instructions on the box and set aside.

In a large mixing bowl add all of the wet ingredients (only one container of the cool whip, the other container is for topping) do not put the pie filling in either. It is for layering.

Next blend all of the wet ingredients until they get nice and fluffy.

Then put half of the creamy mixture into a trifle bowl or very deep glass container.

Layer it next with half the angel food cake. Then gently push the cake down so that you have room for the rest of the layers.

Put a whole can of blueberry pie filling on as the next layer.

Repeat the next layer with the mixture and then the cake. Then the last can of pie filling.

Carefully top with the last container of cool whip.

photo (6)

Place into the refrigerator 5-6 hours or overnight.

I think this will be great topped with granola. Also for the Fourth of July I plan to make this and use cherry and blueberry pie filling and then I will top it with fresh blueberries and cherries.

 
Leave a comment

Posted by on January 25, 2014 in Previous Recipes


Tags: , , , , , , ,

Philly Cheesesteak Stuffed Peppers

photo 4 (3)


I adore stuffed peppers. But we have had them so many times that we have gotten a bit tired of them. Everyone in my family also loves Philly cheesesteaks so when I seen pictures of the stuffed peppers with the Philly cheesesteak I decided to create my own recipe with everything we love and see how they would go over with the family. Well..They were a huge hit and I will be making them again in the very near future! Here is what I did…..


Servings-8

4 green peppers

8 slices of provolone cheese

4 oz. package of fresh mushrooms or canned

8 oz. of Philly style shaved meat frozen or 8 oz. fresh thin sliced roast beef

1 tbsp. of minced garlic

1 large sweet onion sliced as thin as you can get it

2 tbsp. butter

2 tbsp. oil

Toppings: add to taste –  salt & pepper, sub oil, and crispy fried onions


Pre-heat oven to *400 degrees

Wash  the peppers.

Slice the peppers in half . Remove the ribs and de seed them.

While I was sauteing the onions and mushrooms I placed the green peppers on a baking sheet and pre-heated them for about 10 minutes so they would not have a really strong flavor.

Caramelize your onions and minced garlic, mushrooms in butter. About 15 minutes on med-high heat.

photo 3 (5)

Remove onions and set aside.

Place oil into hot pan carefully and heat the meat thoroughly.

Add the onions and mushrooms back into the meat and heat the mixture thoroughly.

photo 4 (2)

Remove the peppers from the oven and place a slice of provolone inside of each pepper.

photo 1 (11)


Then add the  meat,onion, and mushroom mixture into each pepper, Then this is when I sprinkled them with sub oil, salt, and pepper.

Top with another slice of provolone and then top with crispy fried onions.

Bake in the oven for 15 minutes at 400 degrees. Enjoy!

photo 3 (6)

Anyone have any other suggestions on toppings?


Leave a comment

Posted by on January 24, 2014 in Previous Recipes


Tags: , , , , ,

2 Ingredient Chocolate Cherry Brownies

Chocolate Cherry Brownies

Chocolate Cherry Brownies

I get really excited when I find recipes that only call for 2-3 ingredients! But most I have tried have not worked out. I decided to try mixing a box of Devil’s Food cake mix with a 21 oz. can of cherry pie filling to try to see if it would rise like a cake. Most recipes called for adding butter but I decided to try to leave it out and see if it would still work and taste good..and it did 🙂 But…it did rise but not like a cake. I checked it at 20 minutes and was thinking this is a gooey mess but then after 5 more minutes the toothpick came out clean and I let it cool for a minute. It was a big hard to cut but it tasted just like chocolate cherry brownies!! I topped it with some cool whip and we ate over half the pan in one night lol! It goes really good with some cherry ice cream too.

photo 1 (9)

1 Box of Devil’s Food cake mix

1 21 oz. can of cherry pie filling

Pre-heat oven *350

Grease a 8×8 glass baking dish . I used a 9×13 but next time I will use a 8×8 to make them thicker.

Also I sprayed my spatula with a bit of cooking spray and it helped to spread it because it is really gooey.

photo 2 (9)

In a large mixing bowl combined the cake mix and canned cherries.

Spread the mixture into the greased baking dish and bake for 20-25 minutes. Or till a toothpick comes out clean.

photo 1 (7)

Top with some whip cream and enjoy!

photo 2 (8)

Almost too easy! Does anyone have any other dessert ideas that have worked with only 2-3 ingredients?

 
Leave a comment

Posted by on January 23, 2014 in Previous Recipes


Tags: , , , , ,

Twice Baked Ranch Potatoes

Twice Baked Ranch Potatoes

Twice Baked Ranch Potatoes

6 large potatoes..washed

1 packet of Ranch dressing mix

3 tbsp. of sour cream

1/3 cup of milk

1/2 tbsp. of butter

4 oz. of cream cheese

For topping

2 cup shredded cheese

5-6 strips of bacon..cooked and crumbled

Wash  6 large potatoes and poke them with a fork.

Cover in foil and bake in the oven at *425 for 45 min.

Twice Baked Ranch Potatoes

After they have cooled a bit carefully slice the potatoes in half.

Place all of the halves on an ungreased baking sheet and carefully take a spoon and make an indent around the edge of the inside of the potato (this helps when removing the insides).

Then scoop out the insides leaving a bit on the shell so the shell will hold together.

Next put all of the potato that you scoop out into a large mixing bowl.

Add sour cream, milk, butter, ranch mix and cream cheese.

Beat with mixer until the potatoes are nice and fluffy.

Spoon the mashed potatoes back into the potato shells and top with the shredded cheese and bacon.

photo 3 (3)

Place in oven at *350 for 30 minutes.

My kids absolutely love these. I love them with a bit of green onion on top too. I would love to hear about any variations that you like!

photo 3 (1)

 
3 Comments

Posted by on January 22, 2014 in Previous Recipes


Tags: , , , ,

Bacon Cheeseburger Rolls

Bacon Cheeseburger Rolls

Bacon Cheeseburger Rolls

I always love the smell of garlic, bacon, and ground beef but when you add in the onion and cheese and sweet smell if bread from the crescent rolls..I am in Heaven!! Okay I will tell you that this is not the healthiest recipe but there are substitutions that can make it a bit healthier. I will be pairing this with a salad so I am sticking with the ooey gooey goodness that is involved with the bacon and beef!

1 pd. ground beef ~ can sub. for ground turkey

1 small minced onion

4 oz.  of cream cheese

6 strips of thick cut bacon – or half a package of pre-cooked bacon or turkey bacon

2 packages of crescent rolls

1 tsp. of garlic salt or 1 clove of garlic.

1 bag of cheddar cheese squares

Pre-heat oven to *350

Mince your onion and garlic.

Brown the ground beef with the minced onion and garlic.

Drain any grease.

In a large bowl put the cream cheese in the bottom.

Once the beef mixture is cooked and drained, place it in the bowl on top of the cream cheese to help it melt.

Brown your bacon in the same skillet and drain on paper towel.

Crumble the bacon into your meat and add salt and pepper to taste.

Next take your crescent rolls and roll the whole package out on your ungreased baking sheet.

Cut each crescent roll into twos. This is really hard to do and get them even so I used a pizza cutter and it made it a lot easier to cut.

Place a teaspoon of meat filling onto each piece of crescent roll.

Slice your cheese squares into 4 or 5 slices and place one slice on top of each tsp. of meat mixture.

Close the dough around the meat as best you can. Pinch the tops together to seal them up.

Bake in the oven at  *350 for 20 minutes or until golden brown on top.  All ovens bake differently so just make sure to keep an eye on them.

Let them cool for a couple of minutes and then use your spatula to remove them from your baking sheet.

My whole family absolutely loved them! Next time I am going to add some green chiles to spice them up a bit. You could add mushrooms too. Anyone have any other ideas for fillings?

photo 3 (1)

 
Leave a comment

Posted by on January 22, 2014 in Previous Recipes


Tags: , , , ,

Strawberry, Mango, and Pineapple Smoothie

I love it when I can make a sweet healthy treat that is appropriate for anytime of the day or night. I also love it when I can change the flavor just by changing the ingredients and always end up with one that the kids will love. You know the saying “you can’t always please all the people all of the time” well…I think this smoothie recipe begs to differ.Unless they hate fruit and then I don’t know what to tell ya 😉

For these I chose frozen strawberries,mango, and pineapple( you can use fresh fruit too) this time but like I said you can use whatever fruit your kids like and it will still taste great. You can also use different flavored yogurt and get incredible results. You can also try different juices too , just make sure the flavors compliment each other. And for older kids you can add a tsp. of honey to sweeten it even more but I never give honey to a child under 2. So go ahead and try some different combo’s and tell me what you or your kids like the best. My kids love these because they say they taste like the dreamsicle ice cream pops!

1 1/2 cup of orange juice

1 1/2 cup of frozen strawberry,mango, and pineapple mixed fruit

1 cup of vanilla yogurt

1 1/2  cup of ice

Put it all into the blender and mix till it is nice and smooth.

photo 4

 
Leave a comment

Posted by on January 20, 2014 in Previous Recipes


Tags: , , , ,

Grilled Sausage & Veggies

Good evening  🙂

Tonight I wanted something quick and easy to make with as little clean up as possible so I decided on the grill and disposable pans. I chose Italian sausage and zucchini, squash, and onions to grill up.

1 disposable aluminum pan (or you can make a aluminum foil packet)
3 small sweet onions
1 zucchini
1 squash
1/3 cup of extra virgin olive oil
2 tsp. of minced garlic(or garlic powder)
salt & pepper to taste
1 package of sweet Italian sausage

Preheat grill to med-low

Chop the onions pretty small since they take a bit longer than the other veggies to cook.
Chop zucchini and squash and add all veggies to your pan.
Drizzle with oil and season to taste.
Mix well.
Add sausage so they touch the bottom of the pan and cover with aluminum foil.

Grill covered on med-low for 25 min. turning often *cooking times vary a lot with grills so just make sure your sausage is done and veggies are soft.
After everything is cooked I take the sausage and let it cool for a minute and then slice it into bit size pieces and then mix it back in with the veggies.

Bon appétit!!

 
Leave a comment

Posted by on January 20, 2014 in Previous Recipes


Tags: , , ,

Hot Ham & Cheese Rolls

Finally the weekend is here! I am so ready to sit back and relax and watch a movie with the family. I didn’t want to waste a lot of time in the kitchen so…. here is what I did .

Hot Ham & Cheese Rolls

1 package of Hawaiian Sweet Rolls
1 package of sliced deli cheese
1 package of deli ham
1/3 cup of melted butter
1 package of cream cheese (softened in microwave about 60 seconds)
1 pack of onion dip & soup mix
2 tbsp. of melted butter

Preheat oven to 350
Brush the bottom of a 9×13 glass casserole dish with half of the melted butter.
Take the whole package and instead of pulling them apart, use a very long bread knife and slice the whole package horizontally.
Next, soften your cream cheese in the microwave for about 60 seconds and then mix in the onion dip mix.
Place the layer of buns in the dish and spread on half of the cream cheese mix.
Then layer it with your choice of deli ham- I used honey ham.
Top the ham with a layer of your favorite deli sliced cheese- of course I used our favorite 🙂 Colby & Monterey Jack.

Then spread the rest of the cream cheese onto the top layer of the rolls.
Very carefully place the top onto the rolls and then brush the top of the rolls with the rest of your melted butter.

Now bake at 350 for 15 minutes.

Those babies were devoured within minutes 🙂

 
Leave a comment

Posted by on January 18, 2014 in Previous Recipes


Tags: , , , ,

Upside Down Taco Bake

I have been making taco bake forever and it is one of the few things my kids have always loved no matter what age. But tonight I was in a rush and thanks to the rushing I came up with an awesome idea! After the meat was done I mixed in the beans and heated it will stirring it all through instead of layering them onto the meat (saved me some time too).And the only thing I don’t like about the taco bake is how the chips get mushy on the bottom so this time I layered it a bit different and let’s just say that this is how I will be doing my taco bakes from now on.

1 lb. of ground beef
1 packet of taco seasoning
1 bag of tortilla chips
3 cups of shredded cheese
2 cans of refried beans

Suggested toppings are lettuce, tomatoes, black olives, salsa, and sour cream.

Preheat oven at 350 Cook ground beef in skillet until it is no longer pink.
Drain the grease and add your taco seasoning and 1/2 cup of water. Allow to simmer for 10 minutes.
Add in refried beans and stir till the beans are heated thoroughly.
In a 9×13 dish put all of your been and meat mixture. Layer with 1 1/2 cups of shredded cheese.
Then layer with chips and then put the rest of the cheese over the chips.
Bake for 10 min. at 350.

When it comes out it should look something like this.

Now plating it was fun too. Just dish it out and flip it upside down before you put the serving in the bowl.

Next just top with your favorite toppings and enjoy!!

We sure did            🙂

 
Leave a comment

Posted by on January 17, 2014 in Previous Recipes


Tags: , , , ,